Creating a Testing and Evaluation Suite for OpenAI Assistants.
At the time of writing this, OpenAI does not provide a way to evaluate the performance of their models. And to be honest, that makes sense, as the models are trained on a wide range of data and it would be hard to create a one-size-fits-all evaluation suite. In addition to that, OpenAI's newest API feature, OpenAI Assistants, allows users to use specific models in a scalable format with custom instructions per assistant.
The introduction of these assistants has made it easier for people to create and deploy their own custom implementations of these models, but it has also made it harder to scale performance evaluation on individual instances.
Let's break down how we can approach this problem:
Criteria: What should I evaluate my assistants against?
Objective: What is my assistant's end goal? What constitues a "successful" response?
Process: How should I go about testing?
Analysis: What should I look for within my data?
By the end of this guide, you can be well on your way to creating a evaluation system like this:
All of these steps are subjective when it comes to evaluating your system. Feel free to omit or add as you see fit.
All data used in this guide and dashboard is fetched from my OpenAI-Assistants-Link project. ALL DATA IS MY OWN. If you want to use your own data, I would recommend following my guide for setting up the API. See 'API' in the header for more information.
1. Criteria
Let's talk about what we're looking for. For this implementation, we're going to keep things strictly to semantics. I have broken down my criteria into the following categories:
Classification: An enum response (
"Answered","Not Answered", or"Not Allowed") indicating whether or not the assistant provided a relevant answer within its instructions.Sentiment: The sentiment of the user query, using TextBlob.
Category: The best fitting category for the user query, chosen from an existing list of categories.
- "What can you help me with?" -> Category: "About"
Topic: A more specific topic within the category, chosen from an existing list of topics or generated from conversational context.
- "Where do I edit my avatar?" -> Category: "Profile", Topic: "Avatar"
Looking at all of the criteria at a high level, we can start to see how different pieces fit with each other.
Classification is an evaluation of both the user query and the assistant's response, and delivers a concrete metric for filtering on "pure" performance. This piece is essential in the evaluation suite.
Sentiment is less effective as a contextualized metric, but is useful for understanding intensities from the spectrum of a user's emotional state. This can be used to quickly identify intense frustration or satisfaction.
Category and Topic are more about understanding the user's intent. The goal here is to refine what users are looking for when they interact with assistants. This can be used to identify patterns and trends through usage, and can be paired with Classification to provide a more detailed analysis.
2. Objective
Let's focus in on Classification for a second. How do we come to a conclusion on what is "Answered", "Not Answered", or "Not Allowed"?
Obviously this answer is going to vary depending on the assistant's instructions, but we can create a general guideline for what we're looking for. Currently I use the following template for my assistants:
def get_classification(self, instructions: str, query: str, response: str):
    """Determines if the response satisfies the query, based on the
    instructions provided by the assistant"""

    try:
        classification_template = """
        ## Response Classification Task

        **Objective**: Assess and categorize the following response
        based on its accuracy, completeness, and appropriateness
        relative to the input query. Use the options provided to
        assign the most fitting category.

        ### Assistant Instructions
        {{ instructions }}

        ### Options and Descriptions
        - **Answered**: Use when the response accurately and
        completely addresses the query. Applicable even for vague
        questions if the response remains helpful.

        - **Not Answered**: Select this when the assistant fails
        to provide a relevant answer, or cannot utilize its tools
        effectively. This is also the choice for operational failures.

        - **Not Allowed**: Appropriate for responses outside the
        assistant's scope or domain. Use this for queries about
        real-time knowledge or events that the assistant cannot
        address with available tools.

        ### Input Query
        Please classify the following query/response pair:
        """

        template = Template(classification_template)
        prompt = template.render(instructions=instructions)

        options = ["Answered", "Not Answered", "Not Allowed"]
        input = f"Query: {query} \n Response: {response}"

        # classification service built from OpenAI's API and MarvinAI
        classification = Classification(
            name="Validate response", description=prompt, options=options)
        result = classification.run(input=input)

        return result
    except Exception as e:
        print(f"Error getting classification: {e}")
Notice the subtle differences between the three classification options. Each option is concise and lightweight, providing a clear path for the evaluator to follow. With just these simple options we unlock the ability to quickly evaluate performance per assistant.
If you are evaluating multiple assistants in an enterprise setting, it might be wise to add more domain knowledge and strict boundaries to this process.
Let's add context for the Categorization and Topic selection process as well.
The Category and Topic processes are built around a similar structure to Classification, but they also can reference previous messages from the conversation. This helps for situations when a user asks questions like:
1. "What's the weather like in Tampa Bay?"
2. "How about in New York?"
Without context from the previous message, the assistant might categorize the messages as:
1. "Weather"
2. "Location"
But with context, the assistant can understand that the user is asking for the weather in two different locations, returning:
1. "Weather"
2. "Weather"
Let's see these prompts in action!
Categorize:
When selecting a category, we pick from a list of predetermined categories. I use these defaults for all of my assistant categorization:
About: Used when the user is asking about the assistant's capabilities/features or the assistant's domain.
Communication: Used when the user is asking to communicate with a human or something other than the assistant.
Feedback: Used when the user is providing feedback about the assistant or a result.
Help: Used when the user is asking for help using the assistant or its capabilities/features. Also useful for when a user is trying to troubleshoot.
Resources: Used when the user is asking for a resource or link.
Salutations: Used when the user is greeting the assistant or saying goodbye.
Settings: Used when the user is asking to change a setting or preference.
Other: Used when the user's query does not fit into any of the above categories.
If you want to get the most out of this process, I would recommend having custom categories for each assistant to figure out what works best for your use case- these defaults will only tell you so much.
def categorize(
    self,
    instructions: str,
    query: str,
    categories: List[Category],
    previous_messages: list[Message]
):
    """Assigns a category to a query based on a list of pre-determined categories"""

    category_names = [category.name for category in categories]
    categories_described = "\n".join(
        f"{category.name}: {category.description}" for category in categories)

    # extract previous message content, with info about the message category and topic
    previous_messages_formatted = format_prompt_messages(previous_messages)

    categorization_prompt_template = """
    ## Query Categorization Task

    **Objective**: Categorize the following input query based on the descriptions
    provided for each category. Choose the most fitting category for the query.

    ### Instructions
    - **Read through the assistant's instructions** carefully to understand how
    to categorize queries.
    - **Review the categories and their descriptions** to familiarize yourself
    with the available options.
    - If the query fits into an existing category, assign it to that category.
    - Ensure the chosen category accurately reflects the query's content.
    - If previous messages exist, you may use them to build context for the query.

    ### Assistant Instructions
    {{ instructions }}

    ### Previous Messages
    {{ previous_messages }}

    ### Categories and Descriptions
    {{ categories_described }}

    ### Input Query
    Please categorize the following query:
    """

    template = Template(categorization_prompt_template)

    rendered_prompt = template.render(
        instructions=instructions,
        categories_described=categories_described,
        previous_messages=previous_messages_formatted
    )

    classification = Classification(
        name="Categorization", description=rendered_prompt, options=category_names)
    result = classification.run(input=query)
Topic Assignment:
First, let's clear something up. For each category that we have stored in the database, we also have a list of topics that are relevant to that category. Every time we run topic assignment, we pull from this list of topics to assign a topic to the query. If the generated topic is not in the list, we can create a new one and add it to the database.
We keep each topic as concise as possible and we store them as a CategoryTopic, so that we can easily reference them in the future.
Let's take a look at the Topic Assignment prompt:
def get_topic(
    self,
    query: str,
    category: Category,
    previous_messages: list[Message],
    topic_service: TopicService
):
    """Assigns a topic to a query based on a list of pre-determined topics"""

    # create your own custom service to process utils for the topic assignment,
    # I use TopicService as an example.
    category_name = category.name
    category_topics = topic_service.get_existing_topics_from_category(
        category.id)

    # extract previous message content, with info about the message category and topic
    previous_messages_formatted = format_prompt_messages(previous_messages)

    topic_assignment_prompt = """
    ## Topic Assignment

    **Objective**: Assign an appropriate topic to the following input query
    within the specified category.

    ### Context
    Existing Topics (if applicable) for {{ category_name }}:
    {{ category_topics }}

    If the query can be matched with an existing topic within the specified
    category, assign that topic. If not, create a new topic based on the query.
    If you are assigning a new topic, be as general as possible. Try to limit
    topics to one word unless absolutely necessary- the more concise the better.
    Remember, the topic cannot be the same as the category.

    Example:
    User Query: "Who is the current president"
    Category: Other
    Assigned Topic: Politics

    User Query: "Where can I edit my profile avatar?"
    Category: Profile
    Assigned Topic: Avatar

    Remeber that under NO circumstance can the topic be the same as the category.
    Do not add quotes or any other characters alongside the generated topic.
    Please assign a short and concise topic to the following query:

    ### Previous Messages
    {{ previous_messages }}

    ### Data
    User Query: {{ query }}
    Category: {{ category_name }}
    Assigned Topic:
    """

    template = Template(topic_assignment_prompt)

    rendered_prompt = template.render(
        query=query,
        category_name=category_name,
        category_topics=category_topics,
        previous_messages=previous_messages_formatted
    )

    completion = ChatCompletion(llm_model="gpt-4")
    result = completion.run(
        messages=[{"role": "system", "content": rendered_prompt}])
3. Process
My testing process is treated as a FastAPI Background Task, which updates a conversation after a chat message has been fully processed. My testing task is broken down into this order:
Classification: (assistant instructions, user query, assistant response)
Sentiment: (user query only)
Categorization: (user query, existing categories, previous messages)
Topic Assignment: (user query, assigned category, previous messages)
After each step is completed, we update a
Message table with relevant messages from the conversation, and we add the test results as a metadata property. Using a JSON metadata property allows us to add and remove different test results as needed.When we go to load the data for the evaluation dashboard, we can quickly parse the metadata property and display the results in a user-friendly format. Getting the classification from a user query is as simple as:
message.metadata["classification"]This is a high-level approach, and there is a lot of opportunity for customization. Say for example, you have a robust RAG system for retreiving documents for assistant usage and you want to evaluate performance based on that. You could add a
DocumentRetrieval class to the process and evaluate the assistant's performance based on whatever metrics you see fit. Then, you could add those results to the message metadata property.We can even take it a step further! If you have a larger set of testing criteria, you could create a separate table for each test result, possibly named
Evaluation, and link it back to the message. This would allow you to have a more granular view of the assistant's performance and you wouldn't have to maintain an arbitrary metadata object for each message.To be honest, if I had a larger use case or more cases to test, I would definitely go with the latter option, as it would make the entire process scalable and maintainable. I can only imagine that enterprise-level systems would need this level of granularity.
If you are looking for more information on what to add to your custom evaluation suite, I would recommend checking out these resources:
4. Analysis
Now that we have our data, let's visualize it. We can start off with basic views that we can manage for all/some of our assistants.
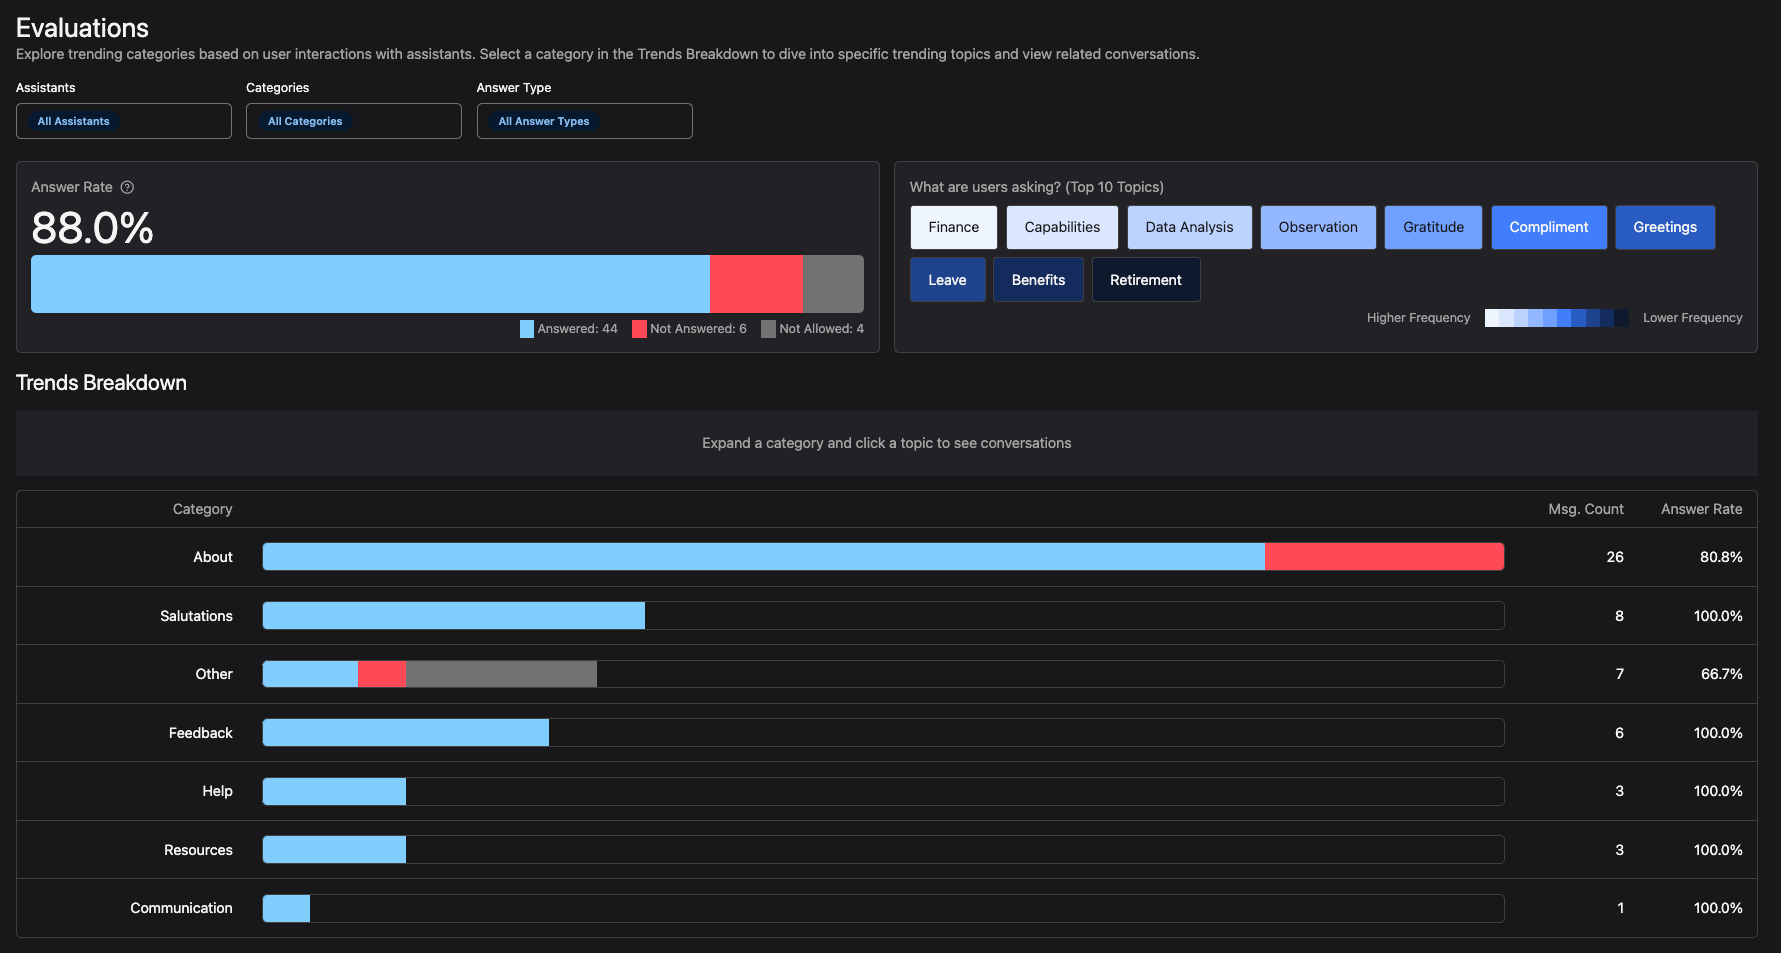
On the evals page, we can see a high-level view of our "Answer Rate" and the "Top 10 Trending Topics".
These views are great for quickly identifying trends and patterns in both assistants and categories. For example, if I want to see the trending topics in my "OpenAI Weather" assistant for my "Weather" category, only when the classification is "Not Answered", I can quickly filter the data and see what's going on.
Now let's move on to the Trends Breakdown section. This section allows us to dive into category-specific data for each assistant. We can see how each category is performing and what topics are trending (by count) within that category.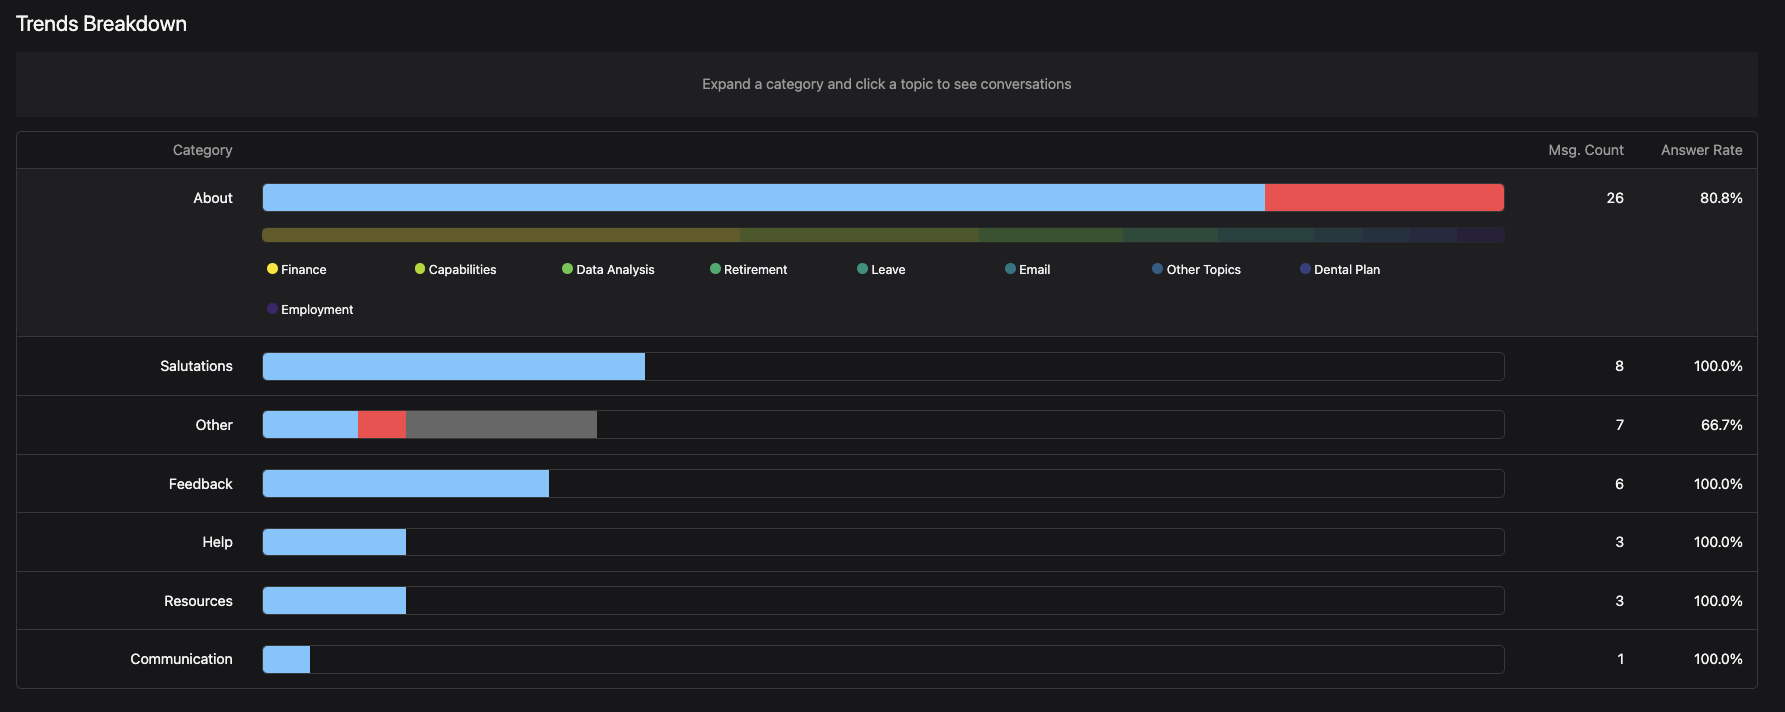
Now that we have stepped into a category, we can view the composition of said trending topics. By clicking on a topic in the Trends Breakdown section, we can see a table of the messages for that topic, specific to all the filters present.
By clicking on a message, we are able to take an even BIGGER step into the data, by viewing the conversation where that message originated. This allows us to see the context of the message and how it was processed by the assistant.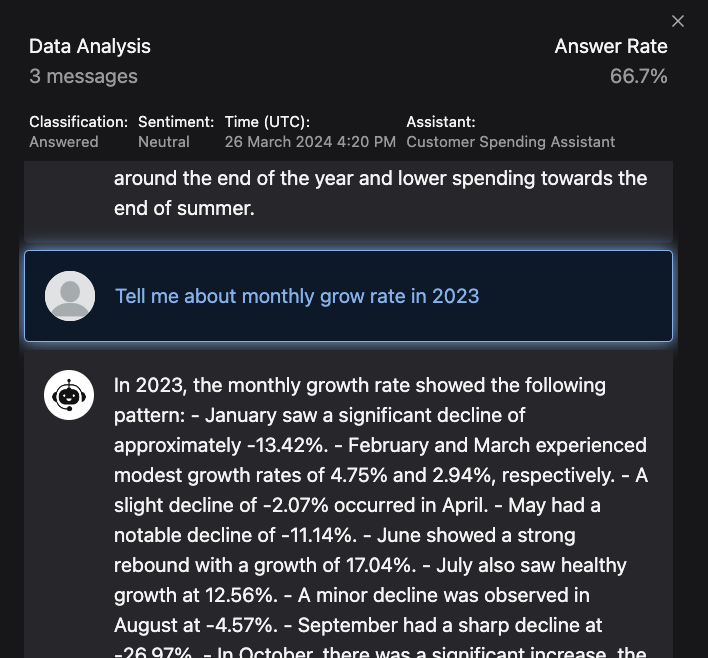
Final Notes
Setting up an evaluation suite for your OpenAI assistants can be a daunting task, but with the right tools and a clear objective, you can create a system that works for you. I have found that the process of evaluating my assistants has helped me understand the strengths and weaknesses of my instructions and implementations, and has given me a clear path for improvement.
If you are looking to create a similar evaluation suite, I would recommend starting with the basics and building from there. Feel free to reference my Assistants Link API to learn how to connect assistants and my Assistant Evals Repo to learn how to create a dashboard like the one here.
Thanks!